🎯 Learning Objectives
- Define HTML and explain its role in structuring web content.
- Describe how HTML elements are used to format data for web presentation.
- Explain the function of web browsers in interpreting and displaying HTML.
- Identify various formats for representing digital data.
💬 Key Vocabulary
- HTTP (Hypertext Transfer Protocol)
- Domain name
- HTML (HyperText Markup Languge)
- Tags
- HTML element
- Title element
- HTML paragraph element
📝 Getting Started – What we already know
The world wide web is a collection of html documents, and they all link to each other using hyper links.
A web browser is a piece of software that understands html documents and display them in human friendly formats.
To access a website, you specify the protocol http (hypertext transfer protocol) and the domain name where the website is located.
📖 Learn It
HTML or HyperText Markup Language is the main markup language for creating web pages and other information that can be displayed in a web browser. A markup language specifies the rules and symbols for formatting text files. The code used to specify the formatting are called tags.
In this unit, you are to learn some of HTML tags to format text, images and backgrounds of web pages.
A text file that uses HTML tags for its format (both layout and style) to be displayed in a browser is called a HTML file. It normally has an .html file extension.
You will use Notepad++ to create and edit HTML files. Notepad++ is very good at help you with coding using syntax highlighting which means using colours to highlight key words, and using indentations to make your code easy to follow/read.
📝 Code It
Step 1
- Open Notepad++ by clicking the Start button in the bottom-left hand corner of your screen, typing ‘Notepad++’ and hitting the enter key.
- Once the file opens, you should see a blank Notepad++ window like this:

Step 2
- In the Notepad++ window, type:
<!DOCTYPE html>
<html>
The <!DOCTYPE> declaration must be the very first thing in your HTML document, before the <html> tag.
The <!DOCTYPE> is NOT a tag. It is an instruction to the web browser about what version of HTML the page is written in.
<html> is a tag. Tags are instructions to a Web browser.
This particular instruction lets the Web browser know that what follows is a Web page, written in HTML: HyperText Markup Language.

Step 3
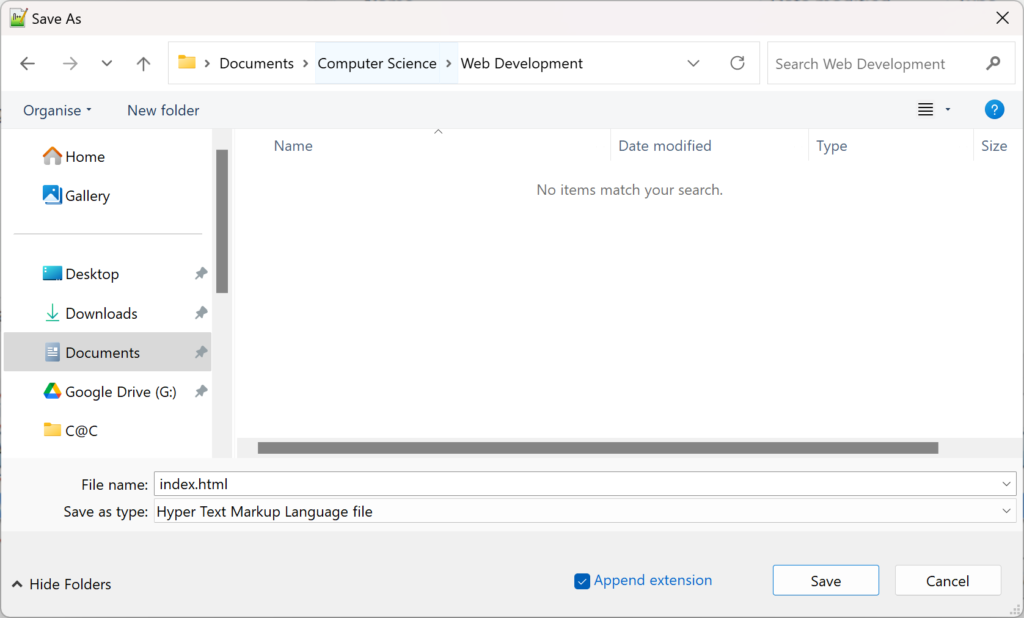
- On the Menu Bar of the Notepad++, click File, then Save As.
- When the Save As window appears, select your Open Drive, then the Computer Science folder you made at the beginning of the year.
- Make another new folder called Web Development.
- Double click on the new folder to go inside it.
- IMPORTANT: In the Save as type drop-down menu, choose Hyper Text Markup Language file.
- Type index.html as the file name and click Save.
Although the declaration <!DOCTYPE html> is missing from the screenshots, it should always be the first line of your code.
📖 Learn It
Whenever you’re creating a Web site, give the home page the file name index.html.
index.html comes up automatically when the address of a Web site or directory is typed into a browser.
For instance, if you go to www.bbc.co.uk, the home page appears automatically. That’s because its file name is index.html.
If the file name of BBC website home page was homepage.html, you’d have to type www.bbc.co.uk/homepage.html to get it to appear.
📝 Code It
Step 1
- Below the <html> tag, type:
<head>
<title>My Dog Jack</title>
</head>
The <head> section of our page contains information that doesn’t show up on the page when it’s viewed in a web browser.
Note the closing </head> tag. In HTML, you must give the browser instructions to end something as well as start it.
Everything from the start tag to the end tag is called a HTML element.
The text My Dog Jack is not a tag. It is text surrounded by tags. The <title> and </title> tags tell the browser what to do with the text: make it the title of the page where appears on the tab of a web browser. This is the title element.

Step 2
- Continue under the </head> tag, type:
<!DOCTYPE html>
<html>
<head>
<title>My Dog Jack</title>
</head>
<body>
<p>My dog Jack is a miniature schnauzer. He is 8 months old.</p>
</body>
</html>
- The <body> section contains information that actually shows up on the page when it’s viewed in a browser.
- The <p> and </p> tags tells the browser to display the text between those two tags as a paragraph. This is a HTML paragraph element.
- The paragraph is placed between the <body> and the </body> tags which tells the browser to display the paragraph on the web page. If we want anything else such as an image(picture) on the page, we also need to place it in between the <body> tags.

Step 4
- You should have the following code in your Notepad++ HTML file. Click File, Save to save the web page.
<!DOCTYPE html>
<html>
<head>
<title>My Dog Jack</title>
</head>
<body>
<p>My dog Jack is a miniature schnauzer. He is 8 months old.</p>
</body>
</html>
2. Go to your folder you created for this project.
3. Double click on the file index.html or right click then choose open with to open it in a browser. You should see your first web page like this:

In this lesson, you…
- Learnt the the definition and role of HTML.
- Used basic HTML formatting.
- Saw how web browsers interpret HTML.
Next lesson, you will…
- Continue to develop your website by adding hyperlinks.
🏅 Level up
🥇 Level 1
- Add two more <p></p> paragraph tags.
- Fill them in with some more information about the 8 month old dog called Jack, use your imagination.
- Upload a screenshot of your code that creates the website shown above.
🥈 Level 2
- Get more than 6 of the questions in this quiz correct.
- Your teacher can see how many you get right so you do not need to upload anything to Teams.
🥉 Level 3 – Structuring a Blog Post
Plan your blog post:
- Choose a topic for a short blog post (e.g., “My Favorite Animal,” “A Day in My Life,” “My Favorite Book”).
- Write a short paragraph outlining the content of your blog post.
Structure your blog post:
- Use the following “tags” to structure your blog post. You don’t need to write code, just indicate where each tag would go and what content it would contain.
<h1>: Where would you use this, and what text would it contain?<h2>: Where would you use this, and what text would it contain?<p>: Where would you use this, and what text would it contain?<img>: Where would you use this? Describe the image you would include and what itsaltattribute would be.<a>: Where would you use this? What website would you link to, and what text would the link have?<ul>or<ol>and<li>: Where would you use a list? Would it be a bulleted list or a numbered list? What items would be in the list?
Example:
Blog Post Topic: My Favorite Book
Paragraph Outline: I would write about my favorite book, “The Hobbit.” I would describe the main characters, the plot, and why I like it.
Structure:
<h1>: I would use this at the beginning of the blog post. The text would be “My Favorite Book: The Hobbit”.<h2>: I would use this to create sections within my post. I would use it twice.- The first
<h2>would be “Main Characters”. - The second
<h2>would be “Plot Summary”.
- The first
<p>: I would use this for the main text of the blog post.- The first
<p>would describe the main characters. - The second
<p>would summarize the plot. - The third
<p>would explain why I like the book.
- The first
<img>: I would use this to show the book cover.- The
altattribute would be “The Hobbit book cover”.
- The
<a>: I would use this to link to a website where people can buy the book.- The link text would be “Buy The Hobbit on Amazon” and the URL would be “https://www.amazon.co.uk/Hobbit-J-R-R-Tolkien/dp/0007525507“.
<ul>: I would use this to list the main characters.<li>would include: “Bilbo Baggins”, “Gandalf”, “Thorin Oakenshield”, and “Gollum”.