🎯 Learning Objectives
- Use movement functions from last lesson to control the rover through a planned path.
- Sequence instructions so the rover moves, turns and stops in the correct order.
- Test and adjust pause values to make the rover travel the correct distance.
- Use selection so the rover can flash its LEDs when it detects a possible sample.
💬 Key Vocabulary
- Satellite image
- Route
- Function
- Sequence
- Pause
- Selection
📝 Starter Activity – Rover Training Check
Before Mission Control allows your rover near the ruins, you need to prove that you remember your training from last lesson.
Answer these questions:
- What does a function do?
- Why did we create functions such as
driveForward,turnLeft,turnRightandStop? - What does sequence mean?
- What does a
pauseblock control?
📖 Introduction
Last lesson, your rover completed its first movement test. Now the rover has been cleared for a real Mars mission.
During the night, a Lincolnshire Space Academy satellite picked up a strange signal coming from under the Martian dust. The satellite has sent back two images. They show what looks like an ancient ruined structure buried on Mars.
Some shapes are too straight to look natural.
Some walls look like they were built.
The science team wants to know:
Could these ruins be evidence of ancient life on Mars?
Your rover has been sent to investigate. However, there is one problem…
The rover cannot drive itself yet.
It needs your code.

Project Setup
To make sure every rover starts from the same setup, open the project link below. This project already contains the four movement functions you need for today’s mission.
Project link:
https://makecode.microbit.org/S75572-92704-60366-77128
Once you have opened the project:
- Save it to your own MakeCode account.
- Check that the four movement functions are there.
- Press edit in the top right corner
- Do not change the functions yet.
- Wait for the next mission instructions.
This will make sure everyone at Lincolnshire Space Academy is ready to program their rover using the same starting controls.
🥇Level 1
The rover has landed near the ancient ruins.
The first satellite image shows a simple path from the landing point to the entrance. This is the safest way in, but the rover still needs accurate instructions.
If the rover turns too early, it may miss the path.
If it drives too far, it may crash into the Martian rocks.
Mission Control needs you to guide the rover safely to the entrance.
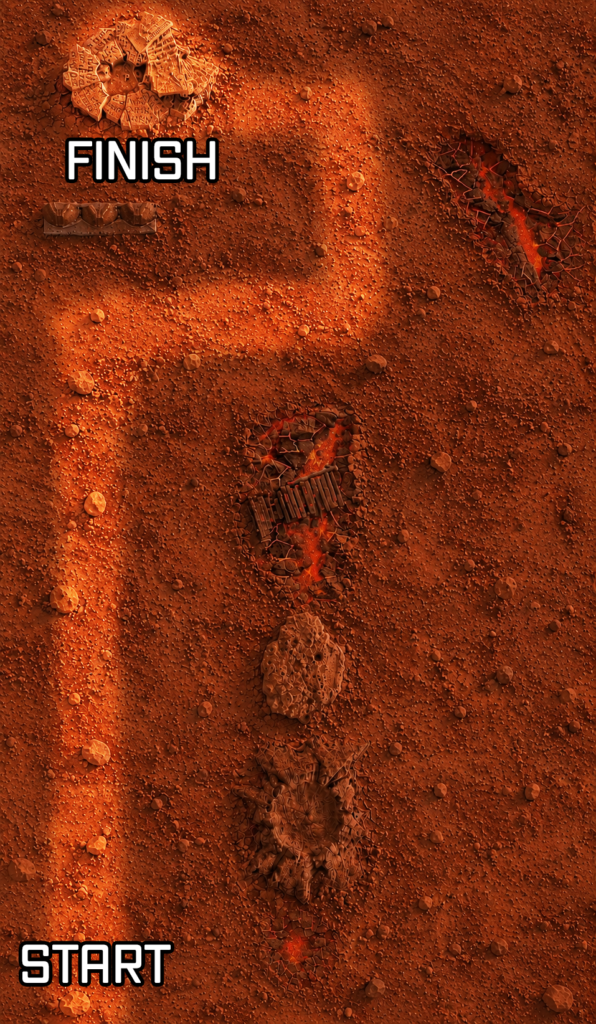
Task
Use the Level 1 satellite image to Sequence instructions to get the rover from the start point to the ruins entrance.
You need to:
- Look carefully at the satellite image.
- Decide what the rover needs to do first.
- Code the first part of the route.
- Download and test it.
- Adjust the timing if needed.
- Add the next part of the route.
- Keep testing until the rover reaches the entrance.
Use your movement functions from last lesson:
driveForward
turnLeft
turnRight
Stop
Remember: the pause controls how long the rover moves or turns for.
🥈Level 2
The rover has reached the entrance.
Inside the ruins, the satellite image shows narrow paths, broken walls and sharp turns. The signal is stronger here, but the route is more difficult.
The rover must travel through the ruins without crashing into the walls.
This is a harder mission. You will need to build and test the route carefully.
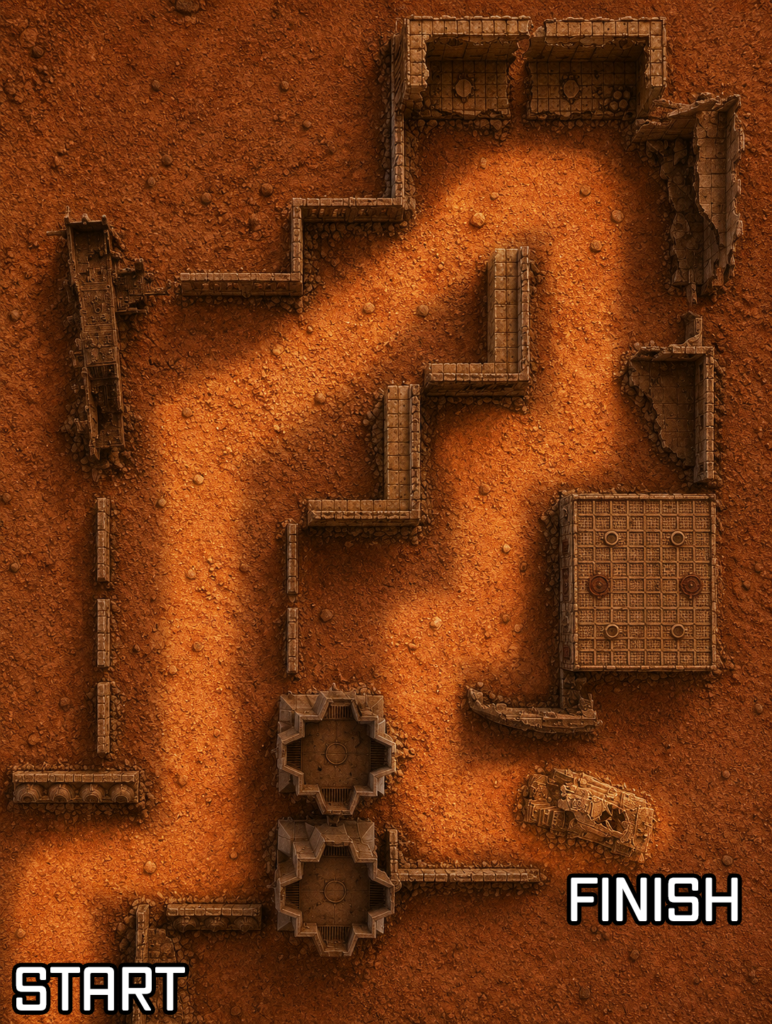
Task
Use the Level 2 satellite image to Sequence instructions to guide the rover through the ruins.
You need to:
- Look carefully at the complex path.
- Work out the route the rover needs to take.
- Decide on the first movement.
- Code and test one section at a time.
- Adjust the timings after each test.
- Continue adding movements until the rover reaches the sample zone.
Do not try to code the whole route in one go unless you are confident.
Testing one section at a time will make problems easier to fix.
🥉Level 3
The rover has reached the deepest part of the ruins.
The strange signal is nearby, but Mission Control needs a way to tell when the rover is close to a possible sample.
The scientists back at Lincolnshire Space Academy have written some pseudocode for the sample signal. However, they need your expertise to turn it into MakeCode and test it on the rover.
If the rover detects an object close enough, the Klip Motor headlights should flash blue, then red.
If there is no object nearby, the headlights should stay off.
Task
You need to turn the scientists’ pseudocode into working MakeCode.
First, add this setup code inside on start.
On start pseudocode
set moveMotorZIP to MOVE Motor with 4 ZIP LEDs
set headlights to moveMotorZIP range from 0 with 4 LEDs
This tells the micro:bit which LEDs are being used as the rover’s headlights.
Forever loop pseudocode
Now add this logic inside a forever loop.
set Distance to measure distance

if Distance < 3 then
    headlights show color blue
    pause 1000
    headlights show color red
else
    headlights show color black
This means:
- the rover keeps measuring the distance
- if an object is closer than
3, the headlights flash blue and red - otherwise, the headlights stay off
Extension
Once your sample signal works, create a separate project and begin to develop the code from the document on using lights and sensors.
Download the document below
In this lesson, you…
Next lesson, you will…
🏅 Level up
🥇 Level 1
- use the simple satellite image to work out a route
- use movement functions from last lesson
- test and adjust movement timings
- reach the ruins entrance
🥈 Level 2
- use the complex satellite image to work out a longer route
- build the route in sections
- test and improve your code
- reach the sample zone
🥉 Level 3
- use a sensor to check for an object
- use selection with an
ifblock - flash the Kitronik Klip Motor LEDs